Hardware Diagnostic Procedures
IG3100 AND IG4100 VERIFICATION CHECKLIST
Please check the gateway using the following instructions and send us the result of each checks for our evaluation.
Visual Checklist
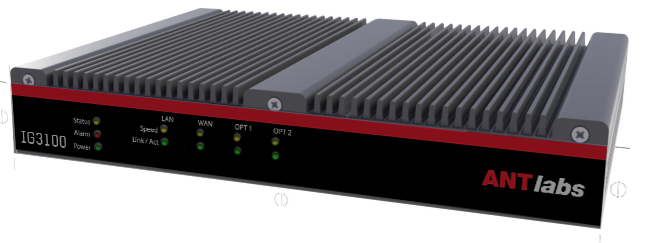
- Ensure the power switch on the back panel is switched on
- Ensure all Ethernet cables are working and connected securely
- Verify if the LED on Power Adapter and the "Status" LED on IG 4100 Chassis are lighted on.
- Verify if all ports are in good physical condition (e.g. Ethernet Port, Serial port, USB port etc)
- Verify if the "Speed" and "Link/Act" LED for each connected Ethernet ports are lighted on.
Functional Checklist
Serial port (PMS) Verification
- Connect a PC/Laptop to the "Serial" port using a working RJ45 to Serial cable*
- Establish a Serial session** using HyperTerminal or equivalent application
- Restart the IG4100
- Press ESC immediately when you see message "Press any key to continue" prompted
- Press ESC again immediately when you see message "Press ESC to enter menu" prompted
- You will be prompted the boot loader menu, Capture the menu screen and select the first option to boot
- Capture the last screen it stops on the Serial Session
b. USB port (Console) verification
- Connect a PC/Laptop to the "USB" port using a working USB to Serial Converter and a working Null Modem Cable*
- Establish a Serial session** using HyperTerminal or equivalent application
- Power up the IG4100 if it's not powered on
- Verify if you are able to see the console login prompt after pressing any key on the Serial Session
c. LAN port verification
- Connect a PC/Laptop to the "LAN" port of the I43100 using straight network cable
- Check if the "Speed" and "Link/Act" LED for LAN port on the IG4100 are lighted on
- Check if you can get a IP Address from your PC/laptop
d. WAN port verification.
- Connect a PC/Laptop to the "WAN" port of the IG4100 using straight network cable
- Check if the "Speed" and "Link/Act" LED for WAN port on the IG4100 are lighted on
- Configure the PC/Laptop with a IP address of the same subnet as the IG4100 WAN IP (default 192.168.0.1).
- Check if you are able to browse the admin GUI using URL https://IG4100_WAN_IP/admin/
e. OPT1 and OPT2 port verification.
- Connect a PC/Laptop to the "OPT1" and "OPT2" port of the IG4100 using straight network cable
- Verify if the LED for each ports are lighted on
Other Verification
- Ensure there is no disruption on the power source
- Ensure the Room temperature is not overheated
- Ensure the Chassis temperature is not overheated
- Verify if there are any unusual sounds (e.g. HDD)
* Additional USB to Serial Converter is required if Serial COM port is not present on the PC/Laptop
** Ensure your Serial Session setting as below:
Baud rate - 115200
Data bits - 8
Parity - None
Stop bits - 1
Flow Control - None
INNGATE 3
This procedure applies to the following InnGate versions:
- InnGate 3.00 E-Series
- InnGate 3.01 E-Series
- InnGate 3.02 E-Series
- InnGate 3.02 Rev.A E-Series
- InnGate 3.10 E-Series
- InnGate 3.10 Rev.A E-Series
(Note: For InnGate versions not listed here, please proceed with the usual RMA procedure.)
Diagnostics of our InnGate servers will be carried out using Diagnostics Quick Tests--one of the options available from the boot menu of the USB Flash Drive for Recovery & Diagnostics (a.k.a. USB installer).
While the USB installer comes pre-installed in InnGate 3.10 and 3.10 Rev.A, it does not come pre-installed in the 3.00, 3.01 and 3.02 versions. In the latter cases, the respective USB installer can be created from the appropriate USB images* and then inserted into the external USB port of the appliance.
*Please contact your reseller for respective USB installer image.
| InnGate Version | USB Installer |
| InnGate 3.00 E-Series | Insert into external USB port |
| InnGate 3.01 E-Series | Insert into external USB port |
| InnGate 3.02 E-Series | Insert into external USB port |
| InnGate 3.02 Rev.A E-Series | Insert into external USB port |
| InnGate 3.10 E-Series | Comes pre-installed in appliance |
| InnGate 3.10 Rev.A E-Series | Comes pre-installed in appliance |
In the log listing, failure is where the text ‘Fail’ is highlighted in red. In reporting a failure, it is important to include the Error Code.
The log file should be saved and will be used to support the RMA.
The USB installer’s diagnostics option supports saving the diagnostics log file to a FAT-formatted USB drive. This is possible only if the FAT-formatted USB drive is inserted before the BIOS boots up. The log file is saved in DDMMYYsh.txt format.
Diagnostic Steps
Prerequisite:
- Access to the machine with the suspected fault
- FAT-formatted USB drive
Steps:
- [For InnGate 3.0x versions only] Insert USB installer into external USB port.
- Boot into the USB installer’s Recovery & Diagnostics menu. Intercept menu within 3 seconds by pressing Up/Down arrow key.
- Activate the Diagnostics Quick Tests option. Should you see the warning "No external USB drive detected", it means the log file will not be saved. You will have to insert an extra USB drive and reboot (Go back to Step 1). If the system has successfully detected your extra USB drive, the log file shall be saved in that drive.
- [Proceed only if your external USB drive has been detected] Press any key to start the diagnostics.
- At the end of the diagnostics, you will see a reminder to look out for red-highlighted word 'Fail'.
- Press any key to review the log listing.
- Use Up/Down/Page Up/Page Down to scroll up/down the log listing.
- Press <Esc> to exit the log listing.
- The system shall prompt you to remove external USB drive. Press Ctrl-Alt-Delete.
- Remove external USB drive. You should safe-keep the log file, which can be used to support RMA.
- Press Ctrl-Alt-Delete to reboot. If you press any key, you will see the command prompt; you should still proceed to press Ctrl-Alt-Delete
 Forgot your password?
 Register